Quantcast
Channel: Backspace does not erase

Made in the U.S.A and in London; Remington Portable 3 typewriter

$
0
0

On Wednesday, December 16th of 1931 this typewriter was purchased in England, most likely bought in London. It was purchased by a Dutch secretary working at the head-office of the Unilever company, then an Anglo-Dutch concern. She was probably travelling frequently between the Rotterdam and London head-offices. The date of purchase was written on the Remington "World Service" label stuck inside the lid of the carrying case.

The typewriter is a then-current Remington Portable 3 in gloss-black. It has a British keyboard layout, so it sports the now-popular @-character and an ample supply of fractions. It is a sober-looking, serious portable typewriter of a quality make.

This typewriter was used a lot and with care, always kept in its case. When it was handed down to her descendants, it was put away safely and stored in a dry and warm location. Many decades later in the 21st century, it was sold to me by her son. He was anxious that it should not end up being scrapped or abused (or 'up-cycled'), but appreciated and preserved. We have tried to do just that.

It only required light cleaning, the typewriter was free of rust and the paint-loss is appropriate for a machine being used well. The platen was however rock-hard; this was sent off to a professional re-surfacing service and now has a fresh covering of 'Contirite' rubber. A few screws needed tightening (carriage-lock bracket has almost worked itself loose), and the shift-position could perhaps be aligned better. The overall condition of the machine so far stopped me from taking-off the housing to adjust the shift; it is simply too nice to risk removing the housing and it types really well as it is.

Its parts were made in America, yet it was assembled in Britain. This means the typewriter has a label that it's made in the USA (on the front), and a text on the back-panel with the extra information that it was assembled in London.


As per standard Remington London practice, the serial-number gets an extra pre-fix letter; this machine is TV240754, instead of a regular 'V' number.

The 240,000 number would place it in November 1929 for the US production. It is possible that this machine remained unsold for 2 years, but also possible that serial-numbers of British machines lag the US numbers.

It is very probable that blocks of numbers were assigned from the US to the London factory who could then manufacture from this block. Unlikely to telegraph new serials every month, more probable that a batch of numbers was periodically assigned for the parts-shipment to London. E.g. twice a year.

The London-prefix numbers were either stamped in London at the machine's assembly, or already complete with prefix during parts-manufacture in the US: marked as a 'housing for shipping out'. It is possible that the production-rate in London meant that the 240,000 number was reached in the British factory only in 1931 - in a numbers block (and parts-shipment) assigned to London at the end of '29. 

An expensive item like a typewriter would be unlikely to spend more than a few weeks from being manufactured to being in a shop. A shop would however depend highly on chance, and may have had a machine in the shop for a year.

It's probably the combination of both, spending time in a store and lagging of London assembly, perhaps by December 1931 the shop really wanted to sell it and gave a discount :)

Whichever way, a November 1929 or a mid 1931 machine; it is a fine, typical specimen of the third iteration of the Remington portable typewriter.

A regular, black Remington Portable 3 typewriter - a quality typewriter from around 1930.


Uncommon variant of a common portable typewriter

$
0
0
Different, yet the lock is very familiar. The case is metal and the carrying handle is a metal casting.


The inside of the lid has all the fittings for securing the typewriter in place. This is unlikely a home-made case, but a professional job; factory-made.


Inside is the very common and unremarkable Remington Portable #2 typewriter. 


It is in a bit of a state and misses a few parts, but these are very well-designed and resilient typewriters - it could fix-up quite well.

Another indication that this is a Remington factory-supplied variant is the case-tabs at the rear. The locking tabs for the case lid protrude through the angled back-panel of the typewriter.


The case tabs pass through slots in the typewriter's back-panel, it's a bit of a wiggle to remove the machine from its base.


This back-panel is a different part from the common, 'normal' back-panel of these 1920s Remingtons. The profile is different and of course there is an extra slot for the case tabs. This looks like a factory-made variant.


The case is made of aluminum, about 1.3mm thick. It's had some repairs, one of the cast corner-pieces has been replaced with an improvised part and overall it's got its share of 'dings'. It doesn't close properly, but still very sturdy and should bend back into shape.


The typewriter itself is very common (and in not-so-great shape), but this aluminum case is a variant not seen before. The uncommon case was the reason to go out and pick this machine up, it was local and very reasonably priced. (Otherwise, I have quite enough Remington Portable typewriters ;-)

Perhaps these aluminum cases were marketed for the tropics, although locally here is certainly not a tropical climate :)

First more cleaning and some research into this!

Music and a no-label disk

$
0
0

Picked up for 50 cents in a local thrift-store. Sleeveless, but still playable :)

From the label, this is music from the 1929 "Fox Movietone Follies". The film itself is lost, no copies survive, but the music was published and recorded. Very up-beat and period jazzy tune :-)

Also included in the purchase; a much older disk that is more difficult to determine - no publishing-label.

Both sides are sung by Miss Olga Orsella with accompanying orchestra in Berlin. It is a dual-sided disk, but there is no catalogue number for the disk itself. Both sides have their own matrix-number only (8509 and 8510). There is no label-name or publisher noted, no mention at all.


From the overall look-and-feel of the disk, it probably dates from around 1910. It could be pressed by Dacapo, or by someone that got their hands on Dacapo matrices. They are one label that can be associated with 'anonymous' records in Germany of the early 1900s. The 8509 could e.g. very well the anonymized Dacapo side D-3300 of 1908 that has the exact same artist and details. Mystery remains why these were re-pressed anonymously; perhaps a way to be 'unfindable' and avoid paying contract/royalties? 

All-in-all well worth the 50cts - jaunty music to play when researching the mystery disk :-)


Avanti - these are fun contraptions

$
0
0

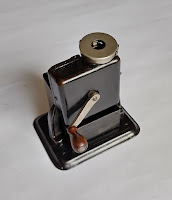
Several hundred-thousands were made of these, but they are somehow rather thin on the ground. Did manage to snag one last week though - with 'patina', but complete and with intact decal.

There -of course- is information about pencil sharpeners on the hive-mind that is the Internet. There is information about the maker of these Avanti devices, the firm of Emil Grantzow in Dresden as well as on the machines and how they evolved over time. Mr Grantzow started patenting and making these little machines from around 1908. From the decal and its features, this specimen can be dated as having been made between 1923 and 1938. 

The remnants of gold pin-striping makes me think this one was made in the 1920s rather than the 30s

To clean the device, it was taken apart as much a possible.

The decal on these machines is by the way not applied direct to the little bin, but is on a separately applied nameplate. The brass knob holds it in place.

All individual parts were cleaned. Hot, soapy water for the greasy parts; scrubbing with stiff brush and steel-wool where needed. A polish for the nickel. A gentle rinse for the lacquered parts in warm water. Then new oil, grease and wax was applied to all parts.

Putting it back together, the pencil clamping-ring is a surprisingly nifty assembly with unexpected split baseplate. That baseplate needs some adjustment to get the friction right, for proper clamping of the pencil. Other than that, it is fairly straightforward. The reduction gear-train is on a plate that can be adjusted to fit properly right-below the pencil clamping assembly.

And all together again; a shiny clean pencil sharpening machine.

Then the question is; does it work?

Yes, it does :-)

The knives are certainly not as sharp as they would have been originally, but it does actually work. It does prefer hexagonal pencils, round ones can slip in the clamps. Very neat is that the lever at the side allows choosing how sharp the point will be; from a robust, blunt to a fine, sharp point for drawing. Also a feature is that when the pencil is sharp, the machine will simply stop sharpening - no 'chewing-up' of a pencil if you just keep turning (and the temptation is there, fun machine).

Every (home-)office should want one! -these really are fun contraptions :-)

Typewriter cleaning-project approach - lots of little bags with little projects

$
0
0

Just started, the cleaning of a Corona 3 folding typewriter.

With a very simple machine, such as e.g. that little pencil-sharpener, all is taken apart and laid out for cleaning. A typewriter however is a large job with several-hundred parts, even for a little folding portable this is intimidating. Daren't attempt that. Also, the projects are mostly done at the kitchen-table so it is important to be able to put everything away.

The solution settled on is lots of little plastic bags. As panels are taken off, they are bagged, the screws are put in a small bag - this bag kept with the panel in a larger bag. As 'units' or sub-assemblies are taken off the machine, they all get put in their own bags with all the screws. When in doubt (e.g. left-right mirrored assemblies) a note is added to the bag describing what the parts are. (And photos are taken before taking off a unit, these pictures are often needed later. :)

This Corona 3 folding typewriter I've had for about a year now. It was very dirty, a little rusty and mostly complete. Small spots of sewing-machine oil were placed on all visible screws before putting it away, so all screws now should come out with relatively little trouble. Ready to be cleaned/restored and get it typing properly again.

When most of the parts on a 'module' are accessible, these are taken off and cleaned one-by-one. E.g. here the carriage base parts are taken off one 'unit' at a time, cleaned and then put back. Small trays are useful to keep screws and whatnots with the sub-assembly.

This way, the amount of scattered parts at a time is limited. This also makes it possible to do a relaxed, slow typewriter cleaning/restoration project as a series of small projects. This method e.g. was also used in the recent full taking-apart down to its baseplate of the Oliver 3 (and its subsequent rebuilding).

The little Corona will be a relaxed, slow cleaning project - or rather; a series of small projects for an evening or afternoon of relaxing tinkering.

Not made by Felt & Tarrant, then not a Comptometer

$
0
0

In 1920 the company behind the Comptometer published an updated edition of their 1914 book "Applied Mechanical Arithmetic as practiced on the Comptometer". This ~600 page book was intended to help sales of the Comptometer to businesses. After a general description of the basic operations of the machine, it gives detailed examples of business calculations and how the Comptometer could make the work-flow more efficient in various industries. With extensive examples of companies' business forms and data shown, it gives a perhaps-unique peek into business information-technology of the early 20th century.

Comptometer sales-numbers by the 1910s had started to pick up, from a very slow start in the late 1880s, but in 1911/1912 the Burroughs company launched a near-identical competitor product. Hence F&T's insistence that they are the only 'real' Comptometer (that risked becoming a generic name for a key-driven calculator). The line "If it's not made by Felt & Tarrant, it's not a Comptometer" is in the footer of every page.

There are several pictures in the book that show Comptometers as used in various offices. (And also some clearly staged scenes to illustrate a workflow.) For example; a page in the section on wholesalers:

A picture is included showing a wholesale office using Comptometers:

But there's something unexpected in this picture. Quite visibly in the front of the view are two of the competition Burroughs copycat machines.

Must've slipped through, probably simply not spotted. Those Burroughs machines were the reason for that line at the foot of every page. Felt & Tarrant also filed a patent lawsuit against Burroughs about this machine - forcing Burroughs to withdraw it from the market. (Burroughs however re-designed and introduced a new, smaller machine and stayed in the key-driven calculator market.)

In their operation and in how they are used in the information-workflow of an office the Burroughs Calculator and the Comptometer are identical. However, as the footer drives home on every page: they're not made by Felt & Tarrant, so they are not Comptometers.

With the register showing 37,639,572,042

$
0
0

The 1920 printing of "Applied Mechanical Arithmetic as practiced on the Comptometer" of course also shows the new controlled-key models with improved clearing mechanism. For example, this 10-column standard configuration model H:

In the photograph, the machine's register is set to display 37,639,572,042 - seems to be a random range of numbers.

To check - also when seen entered into an actual 10-column Model H, the numbers seem random. 

Most likely 37,639,572,042 is merely to show that the register can contain digits, with no obvious link to any of the many calculations in the book - but still wondering if there's an Easter Egg hidden in there somewhere. (That I'm not yet seeing - anyone?) 

There'll have been someone before

$
0
0

When working on a decades or century old typewriter, chances are that this is not the first time the machine has been worked on. Quite often the tell-tale signs are marked (mawled) screws or scratches inside the mechanism. 

Or as here, clear signs of the wooden spacebar having been re-fitted with new holes some time in the past. Just like the traces of black paint daubed over parts of the mechanism; signs of earlier fixing and sprucing-up.

This Corona 3 folding typewriter has now been completely taken apart. Despite the signs of older work on it, fairly certain this is the first time since 1919 that the frame has been quite this empty.

Hadn't seen a Corona 3 this way before; the serial number is actually in an obvious, logical spot - easily readable too :)


Progress on the Corona 3, emptying of the little bags

$
0
0

Most of the parts in the plastic bags have been cleaned, so re-assembly can start. The Corona 3 folding typewriter is a reasonably straightforward machine with relatively few parts. Its construction is however a bit different from most other portable typewriters. It is however similar to most others typewriters in that it has a couple of little 'tricks'. The type of thing you'll know how to do the second time round.

One such trick was that the connecting bar at the lower-rear is not symmetrical. That's the round bar that holds the shift-adjustment screws. It only differs by a mm, but it has a left and a right end.


Taking it out again is a bit of a hassle, but not too inconvenient.

The keyboard is different from most typewriters, in that the key-levers form a sort of 3-row crochet pattern. The 28 key-levers all have an integrated 2-hole bracket that will hold them upright on their pivot-rod.

They keys all are clearly marked where they have to go (of course), so easiest is to set them out in the correct order - for then sliding in of the rods.

When the rods are fitted through all the key-levers and spacers etc again fitted, then the whole assemblage can be inserted into the frame from the front. 

First however; also add the space-bar linkage to this assemblage! The spacebar linkage cannot be inserted into the machine after the keys-levers are fitted (and the main carriage pivot-rod is already in-place).

When the keyboard is mounted the second time (now with the spacebar), the segment can be clamped to the back-wall with the type-bar-rest brackets. 

This is another quirk of the Corona; the segment is not pinned to the frame, but clamped by the brackets. It has a lot of leeway on how it is positioned in the frame, and no easy adjustment screws; loosen the bracket-screws and it all drops down again. (Adjusting will be interesting.)

For fitting the type-bars, the type-bar-rest had to be removed again. Even with the rest removed, it is 'fiddly'.

The type-bars could perhaps be fitted in the segment before mounting that in the machine. Or perhaps even onto the rod that then goes into the segment from the front (it is a slot, not a 'channel'). But then hooking-in of the connecting rods would be impossible to do. 

That the universal-bar bracket has a special cut-out to allow the pivot-rod to pass through as it is fed into the segment is probably a hint that it actually was meant to be assembled this way.

So; progress and already many bags empty :)

Underwood - James Plant, Amsterdam

$
0
0


(And even after then being left somewhere in an attic for at least 50 years, this typewriter still just works - original ribbon and without any cleaning or tweaking. Amazingly durable machines :-)

The James Plant offices are shown in this photograph from the Amsterdam Municipal Archives, taken in 1963 - about the period that the little eraser-shield was given away from this address.

The names of Underwood and James Plant on the facade of the building were recently uncovered and refreshed. This re-done lettering is shown here with some background history on him and his company too.

Typical Corona 3 folding typewriter - very clean

$
0
0

The little Corona is fully re-assembled and -importantly- also working again.

All the little plastic bags are emptied and a missing part replaced with a part from another (wreck) machine. 

The adjusting of the shifts probably would have benefited from special tools. To tighten the lock-nuts more easily without moving the screw also. Even though it is not too complex, feeling the position of one set of stops when the height is set with the other seems harder than it should be. Adjusting the segment and the type-guide also seems harder than it should be - the factory will have had jigs or special tools for this. (Oh, for a good photograph of the adjusting line in Groton! Or factory work-instructions ;-)


Anyhow the typewriter types again, still some tweaking to fix some remaining 'bi-chrome mixing'. Forming the ribbon-tab on the actuating-bar should work for that. New decal applied on the front frame-bar, the other decals are original.


The Corona 3 has the type-bar pivot-rod held not in a channel, but by screws in a slot in the segment - the four shiny set-screws just visible between the type-bars.

The binding of the carriage had an unexpected cause. After tweaking and tuning (bending) all the clamps and guides of the carriage, it turned out to be the spring-drum itself that was fouling its mounting-plate. A very thin brass washer solved that, it now advances without hesitation as it should.


Should've taken pictures of the 'before' state of the machine; even with a seemingly rusty and grimy machine it can come out very shiny. The typewriter is now also very clean, no dirt even in the deeper recesses of the mechanism; also good to know for a machine kept indoors :)

Restoration of a Standard Folding Typewriter - stripping lacquer off aluminum

$
0
0

The full re-build of the little Corona 3 was actually done as a trial-run for the possible full re-build and restoration of my Standard Folding Typewriter. This relatively rare machine carried much history with it, signs of repairs and use over its lifetime. It however also looked 'derelict' and frankly it is/was. Being a bit daunted by the machine, it'd been kept wrapped (dirty!) on a shelf since getting it in 2022.

The Corona 3 proving to be feasible, the Standard Folding was now decided to get a full re-build. This will make it look better, cleaner and perhaps even functional. (And not looking like you'd catch something off it at 6 yards probably also would enhance its chances of surviving.)

The crinkle paint probably was applied in the 1930s, so historical of itself already. This had however to be completely removed for a restoration. All screws had been painted-over and impossible to remove, and also of course because these machines should be plain, dull aluminum.

Stripping paint from aluminum cannot be done with the usual method of lye; this would destroy the aluminum part (and potentially be quite dangerous too)! An alternative method is then acetone; especially older lacquer should dissolve and/or soften with acetone (i.e. nail-polish remover).

Because acetone is very volatile, a lidded bin was used and a few liters of acetone bought. Some paper painters-tape to better seal the lid and then propped-up to allow 'dunking' of the painted frame.


Note that also the celluloid top-layer of the old keys will react with the acetone. As these were not original and going to be replaced anyways; these were left on the machine. (And also because all screws were painted-over solid and couldn't be taken off.) 

The acetone-method does work, but needs much more time than the lye-method. Only after two full days in the acetone-bath was this lacquer fully softened.


After leaving it in acetone for 48 hours, the machine still looked painted black as before. The lacquer on the frame had by then however completely softened to a 'paste' - it could be simply wiped off with tissue-paper or a soft brush.


After wiping-off the black goo, fortunately most of the frame's original passivated-aluminum finish came out fine. Unfortunately, the front-panel and the carriage-panel did not come out so well, these ended up having to be polished and are now plain, shiny aluminum - to be dealt with later.

Importantly: all screws are released from their lacquer-seal and the little machine can now be taken fully apart for cleaning and re-building!

Starting re-building the Standard Folding Typewriter

$
0
0

Using the proven project-approach of putting all parts in little bags, the Standard Folding Typewriter was completely taken apart. This reduces the machine to a simple aluminum frame. 

The holders for the (new) rubber feet were already sanded bare and re-lacquered black.


Then one-by-one, all the parts are cleaned until there is a collection of clean parts in bags. The cleaning really made a difference. As illustration; the lower rod in below image looked just like the rod above it - very satisfying difference :)


Using the great step-by-step guide "How To Build A Standard Folding Typewriter: Part 1" at the Words are Winged blog as a guide, the first parts are mounted back into the frame. As advised, the shift-lock bracket was mounted before placing the main pivot-rod with the shift-keys.

Re-building started :-)

Keyboard repair (and new labels) for the Standard Folding typewriter

$
0
0

After almost 115 years, the keyboard of this little Standard Folding was in a bad state. Most keys had their label and keyring replaced, probably some time in the 1930s or 40s. The replacement rings are a wrong 'flat' pattern and the labels look similar to those used for the later Corona Special machines. To add to this, the 'U' key-lever had lost its key entirely.

Before untangling the 'tapestry' that is a folding keyboard, a picture to note also the position of the spacers at the rod-ends. Some of the key-levers had rusted onto their rod - or rather the rod rusted firmly into the key-lever aluminum bush. These needed several days of oil and gentle tweaking (aluminum is soft!) to loosen them - giving it more time usually helps :)

All key-levers were cleaned with soapy water. Actually, most still needed a scrub with very fine steelwool to make them presentable. Another rinse after the scrubbing to make sure no steelwool debris remains on the parts.

As the key-labels were going to be replaced anyways, the old replacement-rings were removed. The keys are aluminum disks of ~13.8 mm diameter and 2.5 mm thickness (1/10 inch I guess). In the centre a 2.5 mm square hole. Aluminum is an easy material to work with by hand, it's soft and filed easily - nevertheless a 2.5 mm square hole in a 2.5 mm plate is tricky.

Keeping a new keyring handy for checking the fit/diameter, the 'U' was given a new key - the lower key-lever in the image above has the new 'U', an original for reference at the top.

Using the many useful images of Standard Folding keyboards online and exploring ~1903 typefaces, new key-labels were drawn in Inkscape. The curvy, 'art nouveau-ish' typeface can also be seen on the patent-prototype from 1903, and was kept for nearly all Standard Foldings. Very period in styling. (See patent-model picture on page 200 of the book "Typewriter - a Celebration of the Ultimate Writing Machine" by paul Robert and Peter Weil.)

Couldn't resist and made it a proper keycard. Here below in fairly high-resolution, in case anyone has a Standard Folding in need of new key-labels. (Many of these machines have damaged key-tops - the originals are made from card with a thin celluloid top-coating. This top-layer wears through over time - perhaps from typing with fingernails touching the keys.)

The labels were made with same method used before on the Erika. The keycard was laser-printed on ivory paper, then sealed with artists-varnish and given grey paint on the back to seal/make opaque. This should make the labels last, resistant to wear and moisture. 

Experimented a bit, and settled on using a 13 mm hole-punch to cut out all the new labels. The same way a set of thin plastic-sheet covers were stamped out. With a set of newly polished key-rings, all parts in place to re-label all the key-levers.

The key-rings were taken from a wrecked 1917 Corona 3. They are not quite the right pattern for a Standard Folding (and not tall enough), but less wrong than the previous and they are from the same company. The rings for the shifting keys are still the 1910 original rings - which is fortunate, because the donor-Corona already had lost a ring and had exactly 28 rings left on it (backspace made 28th).

Some PVA glue was placed on the keys before placing the label to prevent it rotating - and the PVA should not adhere to the aluminum and will make it possible to cleanly undo this restoration later. Firmly pressed down the stack of label and plastic cover with the ring and folded over the tabs with a screwdriver-tip to fix it all in place. Only one tab broke (unfortunately), so a small dab of cyanoacrylate placed there. (Cyanoacrylate is by the way also safe for restoration, it can be cleanly removed by heating it - placed in hot water it will loose aldl strength and fall apart.)

Then weaving the re-labeled levers and spacebar back onto the three polished rods, the assembly is ready for inserting back into the typewriter. Looking much better (and safe to touch again ;-)

Mounting keyboard and typebars and dulling aluminum for the Standard Folding Typewriter

$
0
0

In preparation for mounting the keyboard 'tapestry' back into the frame, the linkages were sorted on length. They are not numbered, so were kept in sets of 14 for left and right sides of the machine to allow every linkage to be placed back in its original spot. (And of course all were cleaned and rubbed with a bit of vaseline.)

There may be a way, but it didn't seem possible to attach the outer linkages to the key-lever when inside the frame. To avoid that puzzle, deviated from the procedure shown at Words Are Winged and already attached the outermost 4 linkages for both left and right. Also the distance-bushes were added, of course.


This whole assembly was then wiggled back into the machine from the front. The three rods fixed with the screws through the frame-sides. Some painters masking-tape on the front bar to prevent scratching of the paint during the process.

The next step was mount the typebars - these were also laid out in the correct order just like the linkages. A little cloth with oil to give every screw a little dab and tweezers to manoeuvre the linkages back into place.

The typebar-rest on the Standard Folding is mounted onto the front-panel and is what determines the height of all the keys. This front panel unfortunately lost its original dull, passivated finish during the paint-stripping. To get rid of the shiny aluminum and make it suitably 'dull', the panel was glass-bead-blasted -very carefully.

The above image shows the left-half already blasted, the right-end still shiny. The blasting was done carefully; only very low air-pressure and especially a very constrained supply of blasting-material. With aluminum there is a very real risk of creating such surface-stress that the part will warp and deform. First practiced on a scrap test-piece. Fortunately, the panel survived unscathed and is now nicely even and dull/matte.

The rod for the springs was bent ever so slightly - either from a 'bang' or from a century's worth of the springs pulling it (although metal should not relax that way). The rod could be rotated a bit to now be pulled straight - all the springs will stop it from turning, so no need to 'fasten it tight' with the screw-thread.

The original typebar-rest felt was kept, merely given a gentle lukewarm wool-wash and turned over. It is clamped between panel and its support bracket at both ends (and some glue-stick glue on the bracket).

The base of the Standard Folding typewriter is now mostly complete; of course all adjustments remain to be done after the whole machine is fully assembled. (A bit daunting; the segment of a Corona 3 is already a bit tricky; this is 28 separate segments to tackle :-)


Starting on the top-assemby and broken worm of the Standard Folding typewriter

$
0
0

Continuing with the top assembly of the Standard Folding typewriter; the carriage was taken off (is was barely hanging on anyways, with only one bracket left). Then first the carriage base-assembly with the folding-arms was taken apart. End result is a pretty bare baseplate and lots of grimy bits grouped in bags. Only the escapement rack and the rear guide-rail were left in-place.

The baseplate is a fairly basic 'slab' of aluminum, also with the dull, passivated finish. The normal cleaning with soapy-water and vigorous scrubbing would have damaged this finish. As an alternative, the part was washed in acetone, 'scrubbing' gently with a soft toothbrush. (Outside/well ventilated and gloves.)

Bag-by-bag all the groups of parts were cleaned with the usual techniques. The spool-bases had originally been blackened and by now become rusty. These were sanded smooth to the bare metal and painted with a satin-black finish.

Result then; a nicely clean baseplate and a collection of clean sub-assemblies. As stated in service-manuals of the time, assembly is the reverse of disassembly.


So it is.

One unexpected complication was the worm of the right ribbon-feed. This was broken! Somehow it got a knock that spread the worm-thread wider in one spot. This made it jam on the sprocket of the spool capstan; it cannot have worked after that damage. Weird that it even broke the worm where it is fixed with a pin to its axle, but did not destroy the flimsy spool-base. Must have been a very targeted knock.

Fortunately it could be tweaked back into functional shape - well, bent-with-brute-force really and some filing too. The broken and bent-back two parts of the worm were locked on the axle with cyanoacrylate. (In case the worm would've completely disintegrated,  a new worm would have had to be made - could probably have been done; tin-plated copper fuse-wire is soft and available in suitable gauge.)


Mounting the rest of the parts on the baseplate is fairly straightforward. Some bending needed for the escapement plate to straighten it, was bent and would jam in its guide. Probably another damage that happened to the machine after it was last used. Fitted back onto the typewriter base, the little Standard Folding typewriter is taking shape - next the carriage (and several missing parts).

Carriage on the Standard Folding typewriter

$
0
0

Moving on to the carriage, the front support studs first needed aligning. These three studs are set-screws that were adjusted in the factory and then fixed in their correct position by 'pinning' then from the front. (That is the cause of the small holes in the front-edge of the base, and why there is a central cut-out in the front carriage-clamp.)

The centre stud had become loose and lost its position, luckly it had not yet worked itself completely free. Against a ruler and using the wear as an additional guide, it was re-fixed at (probably) the right height.

With the same method as before, all parts and screws of the carriage were cleaned and bagged ready for re-assembly. 


The feed roller was left in place (could not work out how that would have to be removed). The combination margin-stops / paper-bails are ingenious. The paper-bail finger is always at the edge of the paper, just out of reach of the typing :)

The carriage slides on the machine-base on the two steel bars or strips at its edges. It is simply metal-on-metal sliding, no rollers of any kind. The rear strip rides in a slot in a profile on the base. The front trip rides on the tops of the three studs.

The carriage is then held in place by clamps at the front and back. The front clamp was missing on this machine - using the useful images of Standard Folding 2's on The Typewriterdatabase and especially the clear photos at Words Are Winged, a functional replacement was crafted from 1 mm aluminum sheet. This is not a strong as the steel original, but should hold the carriage on well enough - this typewriter is unlikely to ever again be used heavily.

Painted satin-black, it works to hold the carriage on its rails. It is now again safe to fold the Standard Folding typewriter!

A length of waxed hemp as draw-string and the escapement works! The spring somehow slips its anchor and won't keep the full pressure needed for the entire travel. Maybe this will be looked at, but maybe not - this typewriter will not be used heavily. Rather, the goal of this restoration is for the machine to be preserved. Ideally it should become functional again, but not to the level of it being a practical typer

Now complete with carriage and platen, the little typewriter is starting to take shape - progress :)

Blowing out dust - period style

$
0
0
Over decades of neglect, an old typewriter or calculator will collect a lot of dust. Even inside a machine's housing, there often is a surprising amount of dust and debris in the mechanism. 


To clean this out, a soft brush is of course useful - taking care to e.g. not disturb any small springs. Another way is to blow out the mechanism with air.


For a smaller repair-workshop and prior to aerosol cans, there could be used a dust-blower. A wooden cylinder, in this case the 'universal dustcleaner':


These are still fairly common, especially this brand of dust-blower with the flowery label. It is a wooden, rolled tube (veneer) lined with cloth and has a wooden plunger with a leather seal.


The leather-seal on this specimen had been folded back, over the wooden plug. Originally it probably would have been folded forward into the tube, thus sealing against the sides with the air-pressure. Some time in the past this dust-blower was opened and the plunger inserted with the leather wrapped over the plug. To be fair, it's quite difficult to insert it correctly from the back, originally it likely would have been pulled in from the front before gluing on the spout.

The leather had hardened completely, making it difficult to shape it back. A lot of leather-wax was added, to hopefully make it a little pliable again. The seal could be replaced with new chamois, but as it's mainly a historical artefact may just be left as-is. Some extra felt rings were added underneath the leather 'dampeners' on the shaft that also had gone hard - to dampen the plunger 'hitting the buffers'.

From appearance, it could date from anywhere between 1880 and 1920. In fact, most of these are much more recent. The actual manufacturing date is stamped on the plunger; this specimen was made March 17, 1938. (The white dust in the image below is talcum powder, added to make it go smoother.)


It does work - not quite as effective as a pressurised-air can for sure, but durable and very sustainable :)

First words from the Standard Folding Typewriter

$
0
0

 After probably at least half a century, the little Standard Folding Typewriter typed!

Well, sort of; it still needs adjusting and it will not be a truly daily-usable typewriter ever again. But it's complete and basically functional.

To get there, a new ribbon was wound on the tiny spools. Both spools are identical, the left and right wound the same direction. (The machine is capable of bi-chrome 'black-red' typing, but black is fine and makes adjusting the ribbon vibrator much less critical.)


The machine only had one spool left, so first a new spool was manufactured. Taking measurements of the remaining original, a reproduction was made in brass. In the image above, original is on the left and reproduction on the right. (Reproduction was made with metric materials - the tube originally probably would've been 1/4" with 3/16" and a bit internal diameter. The flange is closer to 0.7 mm on the original. But that's all details that won't be noticeable :-)


The machine also had only one spool-nut remaining, so one replacement spool-nut was taken from a wrecked Corona 3. The design of spool-nut and capstan was changed from Standard to the 3 - the spring-force to retain the 'loose' nut was moved from a split capstan-tube to a deliberate steel spring in the nut. Definitely an improvement, as the split capstan-tube is liable to yield and lose its 'spring'. (And will then lose its nut. And lose its spool.) A Corona 3 spool-nut fits fine on a Standard Folding and actually is a great replacement, as it will hold even when the capstan-tube has lost its 'spring'.

Both the original and the salvaged spool-nut were heavily corroded. The tops were sanded-down to smooth metal and then re-nickeled. Some light surface-pitting is still visible, but the overall appearance is again clean and shiny.

Oddly, this typewriter was also missing its entire linefeed lever mechanism. This must have been a deliberate removing - you need to take out the platen-rod to be able to take this off. Weird.

With today's online resources it is possible to get a very good impression of what the missing parts looked like. Especially some entries on The Typewriter Database with many detailed pictures were useful - also the images on the Words Are Winged blog were again helpful. Counting pixels in pictures and combining this with measurements on the machine and of the Corona 3 equivalent part, reproductions were made in brass.

After nickel-plating and adding the little wire-spring to push the ratchet-pawl to the ratchet-wheel, the linefeed again works and also looks credible. A functional reproduction that is in-style with the original machine.


This derelict-as-was Standard Folding Typewriter now has all missing parts replaced. It still needs a lot of adjusting, but already a vast improvement over its previous condition :)

Awkward adding machine repairs, a Dalton that's not a Dalton

$
0
0

As an entertaining puzzle. Originally this blocked-wreck was bought to be a source of American-size screws and some spare parts, but was also tempting to see what can be learned from it and what could perhaps be fixable.

This is a Dalton, but it is also not a Dalton adding machine. It was indeed manufactured in the old Dalton factory in Norwood, but this is not a Dalton design. This really is a Remington-Rand 'Portable' adding-listing machine. The Remington adding machine is actually the Brennan adding machine. This company had a brilliant, compact design by Thomas Mehan, but had the misfortune to launch new (expensive) business machine in 1929 just before the crash. When the Brennan company went under in the early 30-ies, it was bought by Remington-Rand. 

Remington-Rand had itself been formed a few years earlier in '27 from the merger of Remington, Rand-Kardex, Dalton and Baker-Vawter Ledger. The newly acquired Brennan design was superior to the by-then aged original Dalton design and from '33 the Brennan-design was basis for the new Remington-Rand  'Portable' adding-listing machine.

Most of these new 'Portable' adding-listing machines were sold as Monarch, many as Remington and some as Torpedo (Germany) or Dalton. It seems the Dalton brand was used mostly in export machines, e.g. in regions where the Dalton name was still valuable. This particular 9-column specimen with display, serial number M 150,893 is from 1937. Like many late 30ies Dalton's, this one was also originally sold in Belgium.

A lot of tweaking and oil on several cams un-blocked the main movement. The blocking was caused by hardened old oil/grease stopping lever springing back when they were expected to do so. The keyboard was however badly rusted, the key-stems no longer moving freely in the slots in the equally rusty key-plate. This specimen being a wreck anyways, the keyboard was taken off and taken apart.


These 'Portable' machines are not easy to work on, the keyboard-assembly is really hard to get out (as commented on by bss1250 in his video on a Monarch). Some bending of the outer side-frames is needed to get it out. The bottom-plate can be screwed off and then the routing of the keys to the number-positions is visible - the row of 'prods' that enter a number into memory are at arrow A. The protrusions on the line B are what trips the universal bar (itself in top-right of picture). All the stems C have a delicate spring on it that pushes the key back up.


When the keyboard is removed, the 9-column register can be seen on the machine, slidable on its rails. The teethed/castellated rack in the front of the memory-bank (pin-bed) engages with the escapement, to index it one position on every digit entered. The pin that's pushed down in a column enters a number, just like the original Dalton. (That lever in front was a bit worrying, that fell out when holding it upside down! Took a bit of puzzling to find where it should go - it's the lever that prevents keyboard-clearing when the repeat-button is pressed down.)


All the key-stems are uniquely shaped, they were all cleaned with steel-wool. Having gone this far, the key-plate was stripped and re-finished with dark green paint.

Re-assembly of the keyboard-assembly is 'hard'. The 13 delicate springs need to be held in place on 13 keylevers that themselves need three tabs to be in slots of both top and bottom plates. The hole in the 'prod' of the key-levers now makes sense - this allows a wire to be fed through to keep them in-place during the assembly. Only after several attempts and extra spring-clips to hold things together, was the keyboard put together again - this is not meant for maintenance!


Again bending the side-frame and a lot of puzzling on how the various levers have to be positioned, the keyboard could be screwed back onto the machine. Now with clean key-stems that spring-back easily.

Numbers could then be entered into the machine, the adding mechanism however still made mistakes. When adding 15 to 15, the result was 20 - none of the ten-carry's worked. Adding 3 to 7 made zero.

How or where the mechanism does (or ought to do) the tens carry was not obvious from peering at the mechanism. Reading Mehan's original patent for the mechanism and looking at the drawings gave however a great explanation on how the carry's are supposed to work. (This by the way also made understandable why an 'empty-stroke' is always needed before the total can be printed.)

When a number-wheel (71) passes from 9 to zero, a notch on this wheel (103, marked green) pushes the lever 104 down, allowing the pin 56a on the rack to enter the slot in lever 104 (circled red). The lever 105 on axle 108 (marked red) needs to spring forward to hold 105 down for the carry to happen cleanly.

On this machine, all levers 105 were glued solid on their axle 108 (red arrow, below). This prevented any carry from happening.

With fresh oil and by forcing the levers to move to break the hardened grease, the levers 105 again moved freely. This actually fixed the carry's!; adding 15 to 15 again gives 30.

With the keys also cleaned (they were grimy-black all-over), the whole machine might actually be fixable.

Viewing from the front, the indexing mechanism is blocking the view to the pin-bed memory behind it. The universal bar (white arrow) is what trips the escapement, the long horizontal spring at the bottom pulls the 'carriage' of pin-bed memory to the left. One position at every digit entered.

These Remington small adding machines are not rare and not valuable today, so a good candidate for the occasional puzzling to fix all the other things that still don't work (e.g. the printing mechanism insists everything is a sub-total). And in case of failure and breaking it, not a big issue either.

A 3D crossword-puzzle, as it were ;-)

Gebruiksaanwijzing voor de Mignon-schrijfmachine (Oskar Markx)

$
0
0

User-instructions for the Mignon-typewriter, from the exclusive importer for The Netherlands; 'AEG-Typewriter Importing', Oskar Markx, Amsterdam. A very informative post about him is at the Schrijfmachine blog.

This booklet was folded-up in the cardboard box that'd normally be supplied with the machine. Sourced from the local classifieds-site - now again with a Dutch-language Mignon Model 4, however a machine without the Oskar Markx label. (Many Mignon's of the late 1920s  in The Netherlands have a decal of Oskar Markx, importer. Just not this machine, maybe not imported by his company or the labeling was not always done.)

The content is the Dutch translation of the original, German instructions; everything you need to know to set-up and use the Mignon. It also is very optimistic on typing speed; claiming a speed of 250 to 300 characters per minute is achievable with a bit of practice.

That's 5 characters per second - quite a feat!

But for just getting to typing with the machine, the instructions are now scanned and uploaded to The Archive, for reading and/or downloading a PDF copy :)

Imported from St. Petersburg to Rotterdam, an Original-Odhner arithmometer model Ag

$
0
0

Imported from St. Petersburg, Russia to Rotterdam, Holland around 1908 by the J.A. Ruys trading company,

The Ruys trading company was the continuation of the Voorhoeve trading company, renamed in 1904 when J.A. Ruys bought-in to take over the company. A major line of business at that time was the importing and sale of Hammond typewriters, and Odhner calculators as shown in the 1904 newspaper ad below.

Hammond machines in The Netherlands often have the brass Ruys shield in the same style as the Hammond shield on the wooden base.

Ruys also advertised the Odhner calculator by itself, for example in this newspaper ad from October 1907.

(More advertisements and some background on Odhner at the informative mechanical calculators pages of Jaap Scherphuis.)

The St. Petersburg-made Odhner machines really are the original pinwheel calculator, the start of the 'category'. As such, it is a historical milestone-machine for automated calculation When this one showed up on the local classifieds site, curiosity won-out and I made an 'impulse purchase' - pretty much the item as advertised in that 1907 newspaper ad.

With almost 30,000 made, these calculators should not be rare and be available at relatively modest prices. The very early ones (with sort crank) are however eye-wateringly expensive these days and even the later, nice specimens with case are becoming sought-after. This later specimen in the state it was in, was fortunately affordable.

This is a model A with 13 digits capacity in the result register. An extra 'g' indicates a bell, so this is a model Ag. The marking with 'Original-Odhner' instead of 'Odhner-Arithmometer' started in 1907 (to set it apart from the increasingly successful clones). Going by the serial-number of 14618 and the advanced features (comma-sliders, fast-clearing bar) this machine was probably made in 1908 or perhaps late '07.

It had been given as a present (retirement gift?) to the grandparents of the seller. Nothing however was remembered about the background or the occasion, it had just been 'around' for decades. There was no case and it is mounted on a (1950s?) small multiplex board. And now sold.

The calculator was also missing its bell, several screws and generally rusty and dusty. It was also very stiff - so did not try to operate it before cleaning and lubricating. Otherwise there is risk of blocking the machine or even breaking something from excess stress.

Without taking apart any of the more complex sub-assemblies, like the drum or registers, it was laid out in its main components. All mechanisms were oiled (sewing-machine oil) and gently worked free. Some assemblies may have to be taken apart later for more thorough cleaning and removing excess (and old) oil.


Metric M2.5 was a good fit for replacements for the cover-screws. Heads were modified to match the pattern of the remaining original screws ('instrument-head'). 

Unsure what screw-threads were standard in pre-revolution Russia, but when the Odhner production-design was made in 1890 or so it was probably designed around 'Sellers' or American threads. The cover-screws are what today'd be called UNF #3-56 screws - the M2.5 is nearly identical in diameter, pitch and has the same 60 degree thread-angle. (International metric is derived from French standard screws, that are in turn derived from William Sellers' American screws with 60 degreed angle.) 

Assuming old American-size threads, the screws in the register wing-nut flange are probably #5. Anyhow, a decent replacement for a missing screw was scavenged from a 1947 Underwood standard.

Most notable of course was the missing bell - a small bicycle bell! At 32 mm diameter it is slightly too large, but does fit and at overflow makes a wonderfully bright 'Dingg!'. It being black also is in keeping with the machine's overall 'not shiny' appearance :)

On older Odhner machines without bell, the carriage can simply be slid out. On this model however, a locking screw has to be removed first (and the bell taken off too). This screw is accessible by first removing the back-panel - it has a squared-off head that will also prevent it working loose as it strikes the two end-stops.

On the right in the image above the only safety interlock of the machine can also be seen. The steel disk with one cut-out works in tandem with the slotted bar to prevent carriage and drum being operated at the same time.

The machine is now free from the copious dust and dirt. The mechanism is mostly functional, although not yet as it should be in all positions. Some of the register-wheels hardly want to move - more disassembly and cleaning will be needed for that. There is also the chance that it is just worn-out. 

Additionally, some of the gear-train and handle have developed play and cause the timing to go slightly off for the safety interlock - to be looked at later too. The rusty covers could perhaps be re-finished, but it may all be left as it is. The calculator just looks its age :)

It also definitely looks 'old' when compared to a 1930s Odhner, side by side in the above image. The later, Swedish-built machine is smaller than the older Russian-made machine, yet with many more features and safety interlocks. The size of the old machine, its features and also very much the curly script do evoke the turn of the century (the 20th century, that is).

A survivor from the dawn of widespread mechanical calculation :-)


Front panel lettering of the Standard Folding Typewriter

$
0
0

The very distinctive 'Standard Folding Typewriter' lettering on the aluminum front-panel is now also applied to the restored machine. At first it was a bit faded and not quite the result that was aimed for, but it did look 'aged' and in keeping with a century-old machine :)


In the process of restoring this derelict machine, the front panel was completely stripped to bare aluminum again. To complete the restoration, it was also to get a new 'decal' with the distinctive 'Old English black' typeface stating that it is a Standard Folding Typewriter.

To start with, a suitable 'Old English' typeface was found and the basic lettering created with it. This already gets close, but there are still noticeable details that are 'off'.


Using some of the many photographs that are available online of Standard Folding typewriters, the lettering was tweaked to better match the letter-kerning and line-spacing.


Then the size of the lettering was estimated from counting pixels on photographs, and calculating what percentage of width of the front panel was the distance between the outside of the uprights of the 'F' and the 'r'.


This lettering was then laser-printed mirror-image on silicone-covered backing paper. That's by re-using the backing of a regular label-sheet for laser-printing - giving several 'heat-transfer' labels.


A 'transfer' was then taped to the front-panel and an iron was used to heat-press the black laser-toner onto the aluminum surface.  The sintered toner again becomes soft and adheres better to the aluminum than it does to the backing-paper, at least that's the theory. (In hindsight, should have cleaned the aluminum surface better, with acetone or similar de-greaser - a next time...)


Some corners of the decal somehow didn't transfer neatly - the right-most 'r' was e.g. missing. Also the black toner transfers to the textured aluminum imperfectly, as if leaving the tops of the texture exposed and resulting in a faded, grey appearance. (Possibly some printer-setting could be found to apply excess toner, again something for a next time...)

The net-result after application was not quite what was hoped for; it does match the look of an aged machine, but does not match the 'new' keys and overall clean machine. On the plus-side, the heat-transfer laser-toner is not fragile - it's a very rub-resistant 'decal'.

Alternatives could have been a waterslide transfer or direct ink-jet printing. Because of the bare, textured aluminum a waterslide transfer is however not ideal, because the outline of the backing would probably show clearly. The direct inkjet-printing onto the aluminum surface also has its challenges; a consumer-printer would require some significant modification to accept the front-panel. A more suitable printer would be a UV-cured inkjet printer that can print also on irregular surfaces. These are usually found in a professional setting (e.g. as used to make promotional merchandise, printing on bottles etc.), so also not readily accessible for tinkering/exploring as an option.

With some careful retouching, the end result of this attempt with heat-transfer of laser-toner is however not too bad. There were enough 'hints' from the transfer to create the missing 'r' and to e.g. complete the 'd'. (Retouching was done with a fine camel-hair brush and black latex paint - this paint can be easily removed with a damp cloth in case of mistakes. Not so durable, but safe and reversible.) 


End-result is a fairly decent reproduction 'decal' on the Standard Folding Typewriter, fitting for a restored 100+ year old machine. 

(There is always the option to clear the panel with a gentle glass-bead blasting and re-do things; in case a better option comes along. For now, we'll leave it for a bit - see how this 'ages' :-)

Standard Folding 2 Typewriter - restored

Why do people keep wrecking these boxes?

$
0
0

Why is it, when a drawing-set case is in a thrift-store, the latch of the box is always destroyed?

Probably because nobody remembers these cases. I.e. that these have a little latch at the front-right corner (or sometimes have two, at both front corners). Pulling-out the latch will unlock the box and -voila- the lid can be opened. For anyone encountering one of these baffling boxes; that's how they open.

This was a decent late 1930s to perhaps 1950 set, made by the firm of E.O. Richter in Chemnitz, Germany. A medium-sized set with ink-pen, a large compass, extender and a drop-bow compass. These are pretty common, but are quality instruments; worth trying to fix. 

To repair the latch, an old 2mm knitting-needle was filed down replace the missing section. The combined part (cyanoacrylate) makes the assembled 'rod' have again the slot for the little nail that locks it in orientation and limits its travel in its channel in the wooden base.

After re-fitting the latch (slide in from the right), placing the locking-nail (through the slot and push firmly into the wood), the purple box-lining is carefully glued down again as is thin paper-edging. An almost invisible repair, this.

These larger Richter-type compasses have a little mechanism that keep the handle straight - this must not be forced; you can't open the legs by pulling one leg and holding the handle. If you do, then the small guiding-rod snaps. That's probably another bit of once-common knowledge that's no longer all that common: the compass should be opened by holding the legs, not the handle. Thrift-store: so a broken guiding-rod. This little guiding-rod is now replaced by a new 'rod' fashioned from a length of M1 threaded rod and two (relatively massive) M1 nuts. (In picture below, centre, they're really rather small :-)

Yet another thing with thrift-store drawing-sets is that bits go missing. The case gets opened (broken open), handled and something will accidentally drop out and is lost amongst the rest of the jumble. This set is only missing its needle-attachment for the large compass. I have a spare part for this, but no needle-screws yet, so this is something to hunt for (or re-create).

These fairly-common Richter sets are difficult to date reliably, but the black tapered plastic handles would make it not earlier than the mid 1930s. The old style of Richter-brand and absence of any GDR quality marks suggest it is earlier than 1950 and probably before 1945.

In any case, the latch-repair turned out well and even though these sets are common (and not expensive), it is a very nice and still usable drawing-set. (And at a fiver, no regrets about getting it :)


Latest Images